Ever wondered how Vmware Horizon is doing its loadbalancing when you have a Cloud Pod architecture configuration?
First it didn't work at all…
Global entitlements is crucial in this configuration. Without, it doesn't know who or what is in the second Pod and it won't work.
But now for the loadbalancing part.
First it looks like a spillover loadbalancing technique:
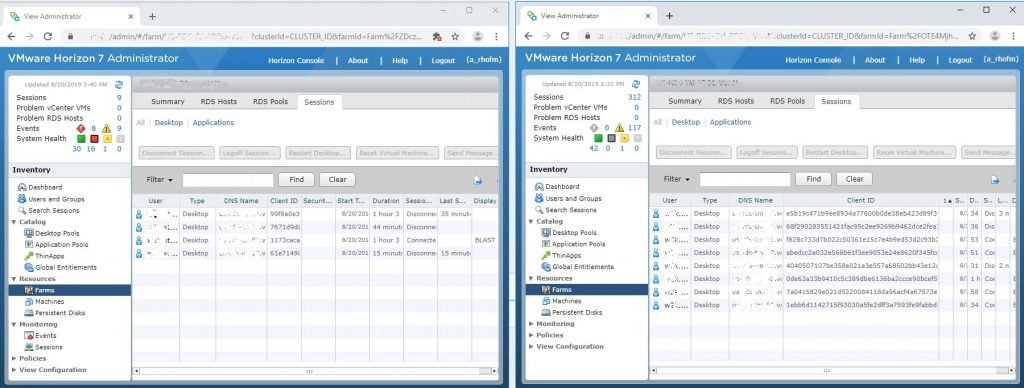
But after we did some more testing we figured out it is much smarter than that...
In our test case, shown above. We had 2 servers on each Pod, 1 (left) with no max allowed connection and the other (right) was also not blocked with any max connections. After it had 8 users and the other Pod had 2, I was already worried so I changed the server to block on 4 users per server.
Because would it fill the right one totally (or 90%) and a little bit on the left? or did it do something different?...
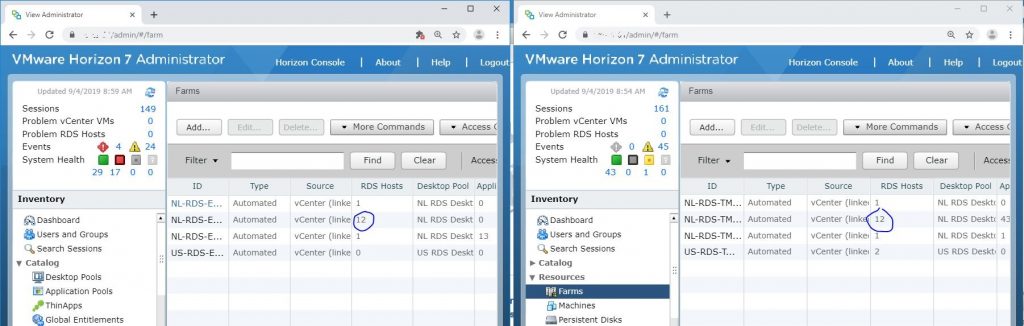
In our next test I created 10 servers on the left, each with a max of 20 users.
On the right we created a farm with 14 servers. Because this Pod is bigger we set the max users to 16. Because of spillover I would guess that the biggest Pod should be filled first after it will use the second Pod.
12x20users (=240users) on one Pod and 12x20users (=240users) on the other, we got a solid 50/50 balanced max user count on each Pod.
The results were exactly what we wanted.
Because I still wanted to know what it does and how he does it, I changed the servers again.
7x16users(=112users) and 18x20. (this is now our primairy Pod)
Results in the screenshot:
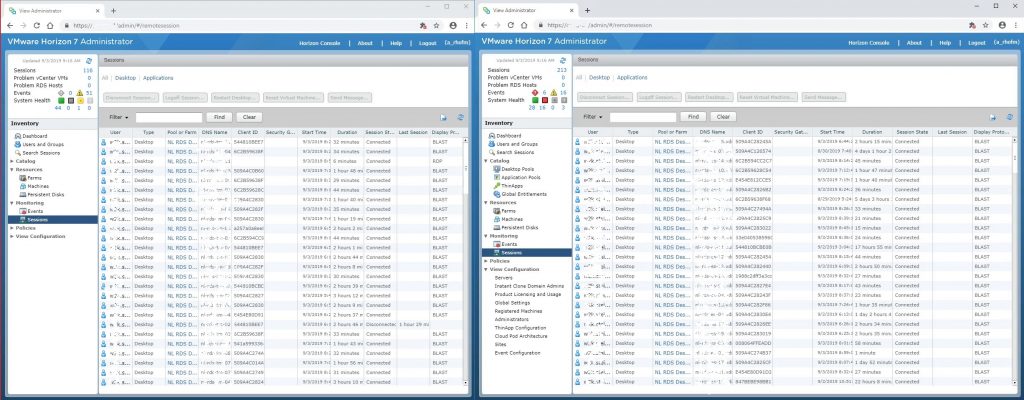
**We also tested with a max of 360 users on both Pods so we know for sure it can handle a failover situation. -Test approved-
On the left we have a maximum of 112, the right could go up to 360.
360 is the maximum users we have, 100%.
The servers are a balance of 25/75. So it began with 50 users on the left and 80 on the right at around 8:00AM. It was almost even balanced as the servers are. When the left side was full after 9:00AM the right Pod filled untill all our users were logged on. (around 340/350)
I think we can take a first conclusion out of this test.
It uses a ratio loadbalancing technique*.
*It will take a look at both maximum loads and divides it by that percentual difference. In our case we want a 50/50 load (active-active). But if you use a 40/60 or for example a 33,3/66,6, it will try to give you 100/200 user load.
More test will show this… to be continued...
Last time I wrote a blog about the CPA script.
We had so much spare time to do other things instead of creating all the applications (in 2 POD's) manually.
But sometimes it is good to know what can be done manually and what you can add with a script within Vmware Horizon.
With a script you can import everything in Vmware Horizon. After you imported a set of application pools and entitlements, you will go back to the administrator console to see what you created, you get the following error:

You broke the application pools tab.
To fix this, you need to delete your just added applications again.
Or a selection of it... Maybe you added a letter within the version field, or you added a blank space in an application ID. Maybe a duplicate ID.
Vmware has some rules, you get an error when you try to add them manually but you won't get it when you import it via a script.
So now we will delete the applications...
Because you can't open the application pools tab, you need to open adsi edit on the Vmware horizon connection server locally. In the KB you can see how to connect to the local Adsi Edit.
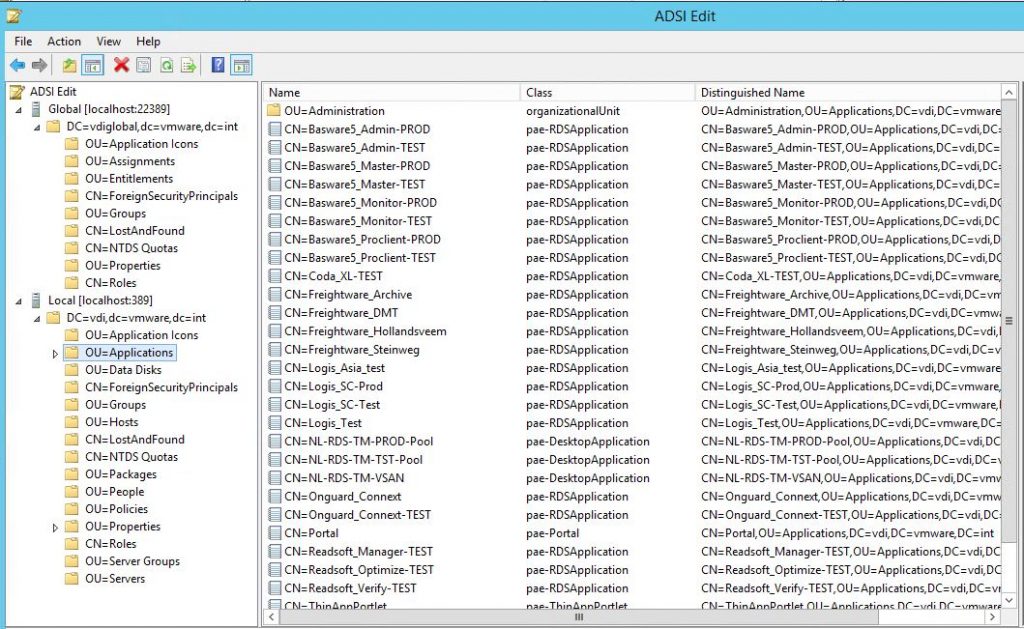
After this, your application pools tab works again.
With Global entitlements you can also brake the list, because there is a limitation. After x global entitlements, they are not shown anymore.
You also need to fix this with Adsi Edit. The KB shows how to connect to the global entitlements Adsi Edit.
It was the first time I implemented a Cloud Pod Architecture (#CPA) at a customer. They wanted an active-active environment over 2 datacenters.
So we made two Pod's within Horizon 7.5.1 and joined each other via CPA.
Great thing, we even got extra features - Global entitlements.
Because we have two Pod's, we also have two view administrator consoles. In both view administrator console we can see that we are a CPA, because in the dashboard we have a Local Pod and a remote Pod.

This is the only thing we can see though.
That we can't see more made it difficult for engineers to manage.
Also a down side of this is that we need to create the same application pools and/or farms in both POD's. After that we needed to connect both pools seperatly to the global entitlement. A lot of work and a lot of maintenance.
At the time of writing I even learned that when you use CPA, the use of local entitlements is not considered to be a good option. Local entitlements would not work properly.
So it is recommended to use global entitlements.
We needed to thinkof something to make it easier for colleagues to work with an active-active Horizon environment. To not create double entries.
So we created an automation script.
With this script you can use an excel document to import applications in both POD's. What do you need?


You can use this script if you like.
I changed a lot within the script to make it anonymous. It should work with the right adjustments.
Also you must install a Vmware powercli module.
- Vmware.HV.Helper
cls

$vCenterServerAccount = "<domain>\srv-horizon7"
$Key = Get-Content "\\<location>\AES_KEY_FILE.key"
$DatabaseCredentials = New-Object System.Management.Automation.PSCredential($vCenterServerAccount,(Get-Content "\\<location>\AES_PASSWORD_FILE.txt" | ConvertTo-SecureString -Key $Key))
$POD1 = <enter your POD1 horizon server>

Connect-HVserver -server $POD1 -Credential $DatabaseCredentials

$hzServices = $Global:DefaultHVServers.ExtensionData
$application = New-Object VMware.Hv.ApplicationService

$appSpec = $application.getApplicationSpecHelper()
$AppPoolSpec = $appSpec.getDataObject()

$objExcel = New-Object -ComObject Excel.Application
$objExcel.Visible = $false

$WorkBook = $objExcel.Workbooks.Open('\\<location of excel>\Apps.xlsx')
$worksheet = $workbook.sheets.item("Apps")
$intRowMax =  ($worksheet.UsedRange.Rows).count


Write-host "*********************************************************************"
Write-Host "Automatically provision apps within Horizon, input from an excel"
Write-Host "Processing: " $intRowMax " rows"
Write-Host ""

# Read excel, ignore first line
for ($intRow = 2 ; $intRow -le $intRowMax ; $intRow++) {


    Write-Host "Nummer:  "$intRow

    $App_ID = $worksheet.cells.item($intRow, 1).text
    $App_ID
    $AppPoolSpec.Data.Name = $App_ID

    $APP_DisplayName = $worksheet.cells.item($intRow, 2).text

    $APP_DisplayName
    $appPoolSpec.Data.DisplayName = $APP_DisplayName
    $AppPoolSpec.Data.Enabled = $true

    $App_Farm = $worksheet.cells.item($intRow, 3).text
    $Farm = Get-HVFarm $App_Farm

    $AppPoolSpec.ExecutionData.Farm = $Farm.Id

    $App_Version = $worksheet.cells.item($intRow, 4).text
    $App_Version
    $AppPoolSpec.ExecutionData.Version = $App_Version

    $App_Publisher = $worksheet.cells.item($intRow, 5).text
    $App_Publisher
    $AppPoolSpec.ExecutionData.Publisher = $App_Publisher

    $App_StartFolder = $worksheet.cells.item($intRow, 7).text
    $App_StartFolder
    $AppPoolSpec.ExecutionData.Startfolder = $App_StartFolder

    $App_Parameters = $worksheet.cells.item($intRow, 8).text
    $App_Parameters
    $AppPoolSpec.ExecutionData.Args = $App_Parameters

    $App_Path = $worksheet.cells.item($intRow, 9).text
    $App_Path
    $AppPoolSpec.ExecutionData.ExecutablePath = $App_Path

    $AppPoolSpec.Data.Description
    $application.Application_Create($hzServices,$AppPoolSpec)

        Start-Sleep -s 10

# if you want to you local entitlements in a non CPA environment

#    $App_Entitlement1 = $worksheet.cells.item($intRow, 10).text
#    $App_Entitlement2 = $worksheet.cells.item($intRow, 11).text
#    $App_Entitlement3 = $worksheet.cells.item($intRow, 12).text
#    $App_Entitlement4 = $worksheet.cells.item($intRow, 13).text
#    $App_Entitlement5 = $worksheet.cells.item($intRow, 14).text
#    $App_Entitlement6 = $worksheet.cells.item($intRow, 15).text
#    $App_Entitlement7 = $worksheet.cells.item($intRow, 16).text


    ## Add entitlement for the new application pool
#    If ($App_Entitlement1) {$entitle = New-HVEntitlement -ResourceName $AppPoolSpec.Data.Name -User $App_Entitlement1 -ResourceType Application -Type User}
#    If ($App_Entitlement1) {$entitle = New-HVEntitlement -ResourceName $AppPoolSpec.Data.Name -User $App_Entitlement1 -ResourceType Application -Type Group}
#    If ($App_Entitlement2) {$entitle = New-HVEntitlement -ResourceName $AppPoolSpec.Data.Name -User $App_Entitlement2 -ResourceType Application -Type User}
#    If ($App_Entitlement2) {$entitle = New-HVEntitlement -ResourceName $AppPoolSpec.Data.Name -User $App_Entitlement2 -ResourceType Application -Type Group}
#    If ($App_Entitlement3) {$entitle = New-HVEntitlement -ResourceName $AppPoolSpec.Data.Name -User $App_Entitlement3 -ResourceType Application -Type User}
#    If ($App_Entitlement3) {$entitle = New-HVEntitlement -ResourceName $AppPoolSpec.Data.Name -User $App_Entitlement3 -ResourceType Application -Type Group}
#    If ($App_Entitlement4) {$entitle = New-HVEntitlement -ResourceName $AppPoolSpec.Data.Name -User $App_Entitlement4 -ResourceType Application -Type User}
#    If ($App_Entitlement4) {$entitle = New-HVEntitlement -ResourceName $AppPoolSpec.Data.Name -User $App_Entitlement4 -ResourceType Application -Type Group}
#    If ($App_Entitlement5) {$entitle = New-HVEntitlement -ResourceName $AppPoolSpec.Data.Name -User $App_Entitlement5 -ResourceType Application -Type User}
#    If ($App_Entitlement5) {$entitle = New-HVEntitlement -ResourceName $AppPoolSpec.Data.Name -User $App_Entitlement5 -ResourceType Application -Type Group}
#    If ($App_Entitlement6) {$entitle = New-HVEntitlement -ResourceName $AppPoolSpec.Data.Name -User $App_Entitlement6 -ResourceType Application -Type User}
#    If ($App_Entitlement6) {$entitle = New-HVEntitlement -ResourceName $AppPoolSpec.Data.Name -User $App_Entitlement6 -ResourceType Application -Type Group}
#    If ($App_Entitlement7) {$entitle = New-HVEntitlement -ResourceName $AppPoolSpec.Data.Name -User $App_Entitlement7 -ResourceType Application -Type User}
#    If ($App_Entitlement7) {$entitle = New-HVEntitlement -ResourceName $AppPoolSpec.Data.Name -User $App_Entitlement7 -ResourceType Application -Type Group}

#}

#$objexcel.quit()


Disconnect-HVserver -server $POD1 -Force


# If you want to use global entitlements:

Write-Host "ADD global entitlements within POD1"
Write-Host "************************************************************"

$s = New-PSSession -computername $POD1 -Credential $DatabaseCredentials

$objExcel = New-Object -ComObject Excel.Application
$objExcel.Visible = $false

$WorkBook = $objExcel.Workbooks.Open('\\<location of excel>\Apps.xlsx')
$worksheet = $workbook.sheets.item("Apps")
$intRowMax =  ($worksheet.UsedRange.Rows).count

for ($intRow = 2 ; $intRow -le $intRowMax ; $intRow++) {

  Write-Host "Nummer:  "$intRow

  $App_ID = $worksheet.cells.item($intRow, 1).text
  $APP_DisplayName = $worksheet.cells.item($intRow, 2).text

  $App_Entitlement1 = $worksheet.cells.item($intRow, 10).text
  $App_Entitlement2 = $worksheet.cells.item($intRow, 11).text
  $App_Entitlement3 = $worksheet.cells.item($intRow, 12).text
  $App_Entitlement4 = $worksheet.cells.item($intRow, 13).text
  $App_Entitlement5 = $worksheet.cells.item($intRow, 14).text
  $App_Entitlement6 = $worksheet.cells.item($intRow, 15).text
  $App_Entitlement7 = $worksheet.cells.item($intRow, 16).text

Invoke-Command -session $s -scriptblock {cmd.exe /c lmvutil.cmd --createGlobalApplicationEntitlement --entitlementName $Using:APP_DisplayName --scope ANY --defaultProtocol BLAST --htmlAccess --authDomain <domain> --authAs $vCenterServerAccount --authPassword $DatabaseCredentials}

    # Because If ($App_Entitlement1) {... Will only be used if the line has a value
    If ($App_Entitlement1) {Invoke-Command -session $s -scriptblock {cmd.exe /c lmvutil.cmd --addGroupEntitlement --groupName $Using:App_Entitlement1 --entitlementName $Using:APP_DisplayName --authDomain <domain> --authAs $vCenterServerAccount --authPassword $DatabaseCredentials}}
    If ($App_Entitlement2) {Invoke-Command -session $s -scriptblock {cmd.exe /c lmvutil.cmd --addGroupEntitlement --groupName $Using:App_Entitlement2 --entitlementName $Using:APP_DisplayName --authDomain <domain> --authAs $vCenterServerAccount --authPassword $DatabaseCredentials}}
    If ($App_Entitlement3) {Invoke-Command -session $s -scriptblock {cmd.exe /c lmvutil.cmd --addGroupEntitlement --groupName $Using:App_Entitlement3 --entitlementName $Using:APP_DisplayName --authDomain <domain> --authAs $vCenterServerAccount --authPassword $DatabaseCredentials}}
    If ($App_Entitlement4) {Invoke-Command -session $s -scriptblock {cmd.exe /c lmvutil.cmd --addGroupEntitlement --groupName $Using:App_Entitlement4 --entitlementName $Using:APP_DisplayName --authDomain <domain> --authAs $vCenterServerAccount --authPassword $DatabaseCredentials}}
    If ($App_Entitlement5) {Invoke-Command -session $s -scriptblock {cmd.exe /c lmvutil.cmd --addGroupEntitlement --groupName $Using:App_Entitlement5 --entitlementName $Using:APP_DisplayName --authDomain <domain> --authAs $vCenterServerAccount --authPassword $DatabaseCredentials}}
    If ($App_Entitlement6) {Invoke-Command -session $s -scriptblock {cmd.exe /c lmvutil.cmd --addGroupEntitlement --groupName $Using:App_Entitlement6 --entitlementName $Using:APP_DisplayName --authDomain <domain> --authAs $vCenterServerAccount --authPassword $DatabaseCredentials}}
    If ($App_Entitlement7) {Invoke-Command -session $s -scriptblock {cmd.exe /c lmvutil.cmd --addGroupEntitlement --groupName $Using:App_Entitlement7 --entitlementName $Using:APP_DisplayName --authDomain <domain> --authAs $vCenterServerAccount --authPassword $DatabaseCredentials}}

Invoke-Command -session $s -scriptblock {cmd.exe /c lmvutil.cmd --addPoolAssociation --entitlementName $Using:APP_DisplayName --poolId $Using:App_ID --authDomain <domain> --authAs $vCenterServerAccount --authPassword <password>}

}

$objexcel.quit()


Remove-PSSession $s
Have fun.
I remember a job in 2017. I needed to add folder redirection to a Horizon View 7 environment. They had UEM 9.0 and like 10 customers.
Previously they had all their redirections in GPO.
Easy peasy because you can choose to follow the Documents folder for example.

If I wanted to recreate the same in UEM, I got a lot of entries to fill in with 10 customers. Also we couldn't follow the documents folder.
So go a minimum of 2 folder redirection "policies" per customer.

But now… Vmware announced that in UEM 9.6 they changed folder redirection.
I am very happy to see this development from Vmware.
I can now tell the customer where I work today that
they can delete their folder redirection GPO in AD and go fully to UEM.
This was beside "trusted sites" the last user policy they have in AD.

Go to https://blogs.vmware.com/euc/2018/12/whats-new-user-environment-manager-9-6.html to read everything about the new version.
 |
Het mysterie ontrafeld! Na een upgrade van SCCM 2012 R2 CB naar versie 1606 verschijnt in de component monitor een mysterieus nieuw component genaamd "SMS_TEM". Er is op dit moment totaal geen informatie te vinden over wat dat component nou is of waar het voor dient. Component status geeft ook niet veel meer informatie prijs dan dat het (correct) geinstalleerd en operationeel is. |
Maar wat doet het dan?
Na wat heftig speurwerk en communicatie met Microsoft zijn we er achter gekomen dat SMS_TEM feitelijk de opvolger gaat worden van SMSEXEC. Dit gaat dus een behoorlijke verschuiving betekenen van hoe SCCM onder water functioneert. Eindelijk, na jaren gaat er ook op dit vlak dus veel gebeuren. Op de korte termijn houdt dit in dat nieuwe SCCM features en updated bestaande features onder SMS_TEM geschoven zullen worden en dus niet meer binnen SMSEXEC zullen draaien. In latere versies van SCCM zullen we SMSEXEC een steeds meer beperkte rol zien spelen.

|
|
Stel: Je hebt een SCCM siteserver (in mijn geval SCCM 2012 R2, versie 1602 Current Branch) welke lid is van Windows domein X. De (SCCM en SUS-) databases bevinden zich in een SQL cluster welke lid is van Windows domein Y. Het SQL cluster bestaat uit meerdere nodes, welke middels active-passive prima dienst doen om de SCCM- en SUS databases te hosten. Alles werkt prima in dit cross-domain scenario zonder al te lastige configuratie-perikelen. |
Leuk wordt het wanneer je (SSRS-) reporting aan dit instance wilt toevoegen. Het is prima mogelijk om SSRS op de individuele SQL nodes te installeren (check dit artikel voor een uitstekende guide hoe dat te doen), maar het probleem komt pas bij de installatie en configuratie van het cluster binnen SCCM. Wanneer de rol "Reporting Services Point" wordt toegevoegd aan het cluster zal de Component Manager-log binnen de kortste keren vol staan met errors. Logisch, want SSRS is niet cluster-aware, SCCM is niet slim genoeg om te ontdekken dat de clusternaam geen fysieke (of virtuele) server is.
Wanneer je in dit scenario vervolgens probeert om het cluster de Reporting Point rol te geven, zal het Component Manager-log snel volstromen met errors. Reden is, dat SCCM het cluster beschouwt als een host. En die host bestaat uiteraard niet, waardoor de installatie van de Reporting componenten zal falen en heel vervelende SQL errors tot gevolg zal hebben.
Wanneer je dan probeert om een van de SQL nodes te voorzien van de Reporting componenten kom je niet veel verder dan het eerste scherm van de wizard. Reden dat de installatie hier zal stokken is dat de node naam geen FQDN is en niet resolved kan worden naar een FQDN, waardoor installatie niet door kan gaan. Omdat het hier een cross-domain situatie betreft zal SCCM deze node beschouwen als of deze zich op het Internet bevindt!
Binnen een single domein scenario zal SCCM de servernaam en FQDN van een SQL node prima kunnen resolven en maakt er zelf een mooie FQDN van, maar binnen een cross-domain scenario werkt dit dus niet.
Oplossing is tweeledig:
1. Voeg de DNS suffixes van beide domeinen toe aan de IPv4 configuratie van de netwerkkaart (als dat niet al het geval is)
2. Open de hosts-file op de SCCM siteserver en voeg daar de Ip-adressen en FQDNs toe van de SQL nodes
Hiermee kan SCCM de SQL nodenamen prima resolven en er FQDNs van maken. Hou er wel erg in dat SSRS uitsluitend te configureren is op de aktieve SQL node. Consequentie hiervan is ook dat SSRS errors gaat genereren zodra de database een failover doet naar een andere node binnen het cluster, maar dat is logisch aangezien SSRS helaas nog steeds niet cluster aware is.
Zo vlak voor het einde van het jaar toch nog een nieuwe Tech Blog over Secure Authentication op de Microsoft Surface Pro 4.
De Microsoft Surface Pro 4 is een fantastische laptop- en tablet vervanger. Met Typecover (toetsenbord) kan de Surface zonder problemen fungeren als laptop, en zonder typecover is het een prima tablet. Maar als je de Surface koppelt aan een Windows-domein komt een Group Policy in actie waarmee Secure Authentication vereist wordt, waarmee het verplicht is om CTRL-ALT-Del te drukken voordat de login-prompt verschijnt.
De Surface Pro 3 beschikte nog over een Windows-knop welke samen met de power-knop gebruikt kon worden ter vervanging van CTRL-ALT-Del, maar de Surface Pro 4 beschikt niet langer over een Windows-knop... Dus hoe kun je een Surface Pro 4 nu zonder toetsenbord unlocken als deze domain-joined is? Swipen op het scherm werkt niet vanwege de Secure Authentication GPO en verder heb je op de Surface zelf maar bar weinig mogelijkheden sinds de Windows-knop niet meer aanwezig is.
Een speurtocht op internet leverde niets op. Ben ik dan een van de weinigen die zijn Surface in een domein gehangen heeft?
Inmiddels heb ik de oplossing gevonden die ik toch even wil delen:
Druk tegelijkertijd de Power-knop en beide Volumeknoppen (Volume omhoog en Volume omlaag) in. Vervolgens verschijnt de login-prompt of Windows Hello zodat je kunt inloggen. Probleem opgelost!
Dit werkt overigens ook wanneer er wel een Type- of Touchcover met de Surface verbonden is, maar waarschijnlijk is het dan toch handiger om gewoon de standaard CTRL-ALT-Del toetsencombinatie te gebruiken.
Tot en met Windows XP werd een zogeheten “SteadyState” functionaliteit officieel door Microsoft ondersteund. De SteadyState functionaliteit houdt in, dat alle wijzigingen die een gebruiker tijdens een sessie doorvoert (de “User-delta”) ongedaan worden gemaakt na een reboot. Bijvoorbeeld: een gebruiker meldt aan op een machine en installeert Microsoft Office. Deze Office installatie zal verdwenen zijn van de werkplek zodra de machine opnieuw opgestart wordt. De SteadyState functionaliteit is dus vergelijkbaar met de snapshot-functionaliteit van bijvoorbeeld VMWare, Virtualbox of Hyper-V, waarmee je teruggaat naar een eerdere “state” van de computer.
Een mooie functionaliteit die veel praktisch nut heeft, maar helaas wordt deze functionaliteit niet meer aangeboden of ondersteund onder Windows 7. Toch is het SteadyState principe nog steeds werkbaar te krijgen onder Windows 7. Zo heeft Panos Macheras hier een mooi artikel geschreven over zijn oplossing voor Windows 7 en SteadyState. Helaas zitten er aan deze oplossing nog wat haken en ogen welke ik in dit artikel zal beschrijven en oplossen.
In de basis is een SteadyState machine niets anders dan een Windows 7-installatie met twee verschillende boot-opties naar een VHD (Virtual Harddisk). De twee boot-opties zijn “Windows 7” en “SteadyState” en hebben de volgende functionaliteit:
Door de boot-timeout op 0 te zetten met als standaard boot-optie de SteadyState boot wordt zeker gesteld dat de gebruiker in SteadyState terecht komt. SteadyState werkt als volgt:
Zodra de machine start wordt een tijdelijke extra VHD aangemaakt waarin de User-delta wordt opgeslagen. Met het afsluiten van de sessie wordt de user-delta samengevoegd met de Windows 7 VHD (merge) of weggegooid (discard). De “Merge” vindt plaats wanneer naar de reguliere Windows 7 geboot wordt en de “discard” vindt plaats wanneer naar Steadystate geboot wordt.
De oplossing van Panos Macheras bestaat uit een (AutoIT-) script waarmee de merge en discard van de User-delta geregeld worden. Nou is Pi-CT eigenlijk geen fan van Auto-IT, maar in dit geval heeft het een aantal voordelen:
De scripts werken op zich prima, maar er zijn een aantal haken en ogen:
Oplossingen voor deze punten zijn relatief eenvoudig:
Mocht je hiermee aan de gang gaan: Succes!
Stuur bij vragen of opmerkingen even een berichtje aan blog@pi-ct.com.
Windows 10 is uit en we zullen natuurlijk steeds vaker met dit nieuwe OS geconfronteerd worden. Het wachten was dan ook op het officieel uitkomen van App-V 5.1 waarmee Windows 10 officieel ondersteund zou gaan worden. We zijn direct na de release aan het testen gegaan en hebben toch wat puntjes gevonden die out-of-the-box niet helemaal standaard werken.
Bij de installatie en eerste test van de App-V 5.1 Sequencer viel het volgende scherm op:

Het is normaal een soortgelijk lijstje te zien wanneer het systeem waar de Sequencer op draait nog niet volledig geconfigureerd is. Bij voorgaande versies op Windows 7 en Windows 8 konden de Windows Defender en de Windows Search services uitgeschakeld worden zodat deze geen ongewenst gedrag zouden vertonen bij het maken van sequences (zaken blokkeren en ongewenst vervuilen met search logs). De melding dat er actieve antivirus software aanwezig is hadden we nog niet eerder gekregen. Enig uitzoekwerk bracht aan het licht dat de antivirussoftware melding getriggerd wordt door Windows Defender.

Het uitschakelen van de Windows Defender zou dit problemen moeten oplossen, maar... in Services.msc liepen we tegen het volgende probleem aan:

Ondanks het feit dat services.msc met elevated rights was opgestart zijn de knoppen om de service uit te zetten, restarten en stoppen uitgeschakeld.
Ook met een elevated Command Prompt kon Windows Defender niet uitgeschakeld worden.

Oplossing kan zijn om te gaan stoeien met ownership van- en rechten op de bijbehorende register sleutels, maar de volgende stappen zijn toch wel wat eenvoudiger om de defender service te stoppen:
1. Druk op de Windows Start knop en ga naar instellingen:

2. Kies rechtsonderin voor “Bijwerken en beveiliging”

3. Belangrijkste stap hier is om de Realtime-beveiliging uit te zetten, maar het kan geen kwaad om de onderste twee beveiligingsopties ook uit te schakelen:

4. Open pas nadat je de Realtime-beveiliging hebt uitgezet regedit.exe als administrator (dus elevated) en ga naar: HKEY_LOCAL_MACHINE\SYSTEM\CurrentControlSet\Services\WinDefend
Pas hier de REG_Dword waarde “Start” aan, standaard heeft deze waarde 2 (Automatic); wijzig deze in 4 (Disabled)

5. Nu we hier toch zijn kunnen we dit ook direct doen voor WSearch (Windows search):
HKEY_LOCAL_MACHINE\SYSTEM\CurrentControlSet\Services\WSearch

6. Reboot het syteem en controleer of de service WinDefend uit staat.

Wat ook opviel was dat de App-V sequencer na de herstart direct weer in het voorbereiding scherm kwam met de volgende melding:

Deze melding wordt veroorzaakt door de Shell Experience Host (een AppX package in C:\Windows\SystemApps). Het is nog niet gelukt om deze melding direct weg te krijgen zonder dat het startmenu ook aangetast en onbruikbaar wordt. Echter dit blijkt niet echt een probleem te zijn want als je even wacht en vervolgens op Refresh drukt zal de melding verdwenen zijn.

Door deze stappen uit te voeren heb je dus de sequencer onder Windows 10 helemaal klaar voor het sequencen van applicaties. Succes!
Al geruime tijd liepen we met het idee rond om onze ervaringen ergens publiekelijk vast te leggen. Dagelijks doen we nieuwe ervaringen op, leren we nieuwe dingen, ontdekken we bugs en vinden workarounds uit. We zijn niet alleen aktief bij klanten, maar geven ook trainingen en ook daar ervaren we waar cursisten tegenaan lopen. Dit is voor ons de voedingsbodem om dit blog in het leven te roepen. We zullen hier vanaf nu regelmatig onze ervaringen posten. Ervaringen die we dagelijks bij onze klanten opdoen, zaken waar we tijdens trainingen tegenaan lopen, maar ook zaken die we als vakidioten gewoon graag willen weten en uitzoeken.
Wat kun je hier dan verwachten? Alles wat te maken heeft met App-V, ThinApp, MSI-packaging en scripting. En uiteraard komen SCCM en andere distributie-mechanismen ook aan bod. Dus eigenlijk alles wat te maken heeft met deployment van software en beheer van enterprise infrastructuren. De bedoeling is dat we inhoudelijk bijdragen aan kennis. Kennis die jij kunt gebruiken bij je dagelijkse werkzaamheden, bijvoorbeeld bij je eigen klanten.
En misschien dat we als "framboos op de taart" ook nog een keer een mooie prijsvraag uitschrijven ;-p
We hebben al een aantal mooie artikelen en interessante onderwerpen op de planning staan dus hou onze website en onze social media goed in de gaten!
Enjoy!


